
 Need to turn a Windows 10 desktop into a WIM (Windows Imaging Format) for rapid deployment?
In this challenge we look at a simple way (using basic tools) to create a WIM for deployment using WDS (Windows Deployment Services). This article focus on creating the WIM in a simple manner; it does not cover (a) details of building a reference computer, or (b) deploying a WIM file.
In this example we use virtual machines to build the reference machine and capture the WIM. This makes it a lot easier as we can attach and detach disks quickly and easily.
Step 1: Create Reference computer
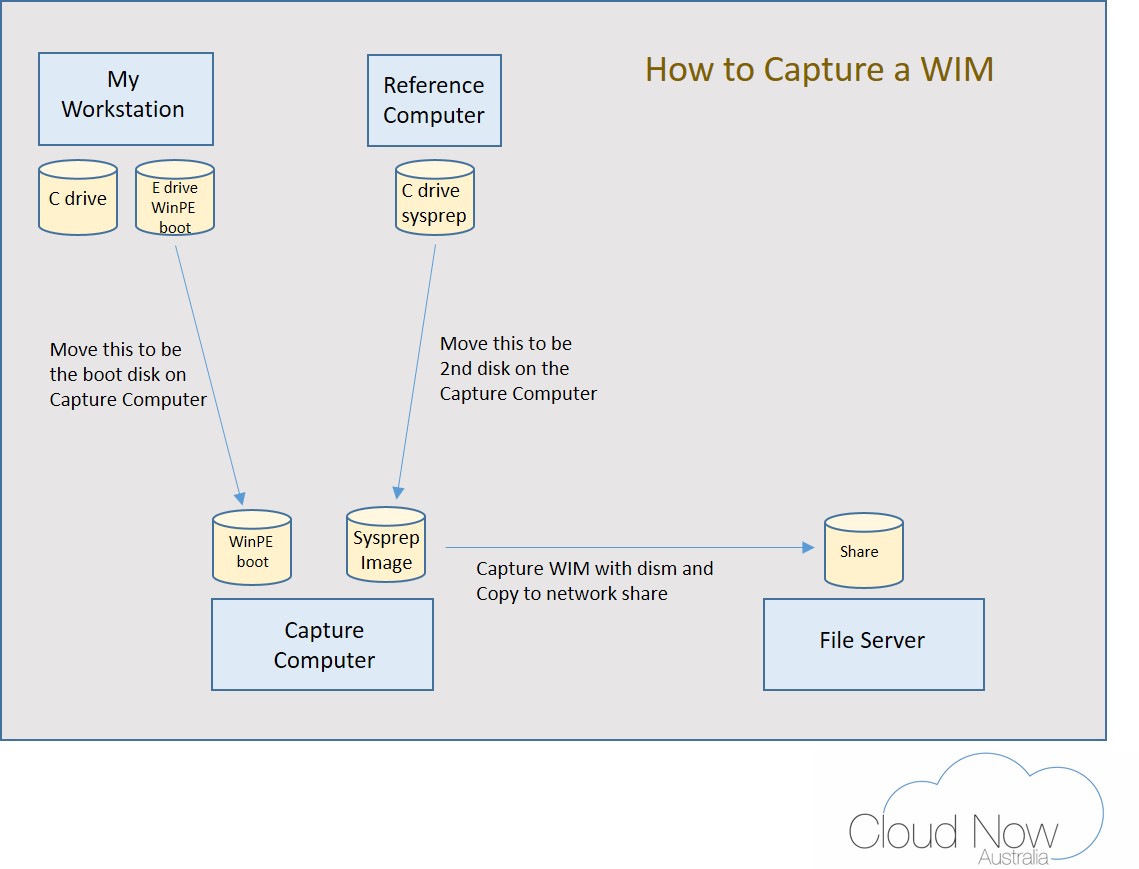
Setup your reference computer and then run SYSPREP with the ‘generalise’ and ‘shutdown’ options. This computer gets turned off and is not used again. We will attach the disk to the Capture Computer in step 3.
Now that we have a reference disk, how do we turn this into a WIM? What we need to do is create a separate virtual machine with a Windows PE boot disk, and then attach the disk created in step 1 as a second disk. We then use a dism command in Windows PE to capture the image to a WIM file.
Step 2: Create a Windows PE bootable drive
We do these steps on another computer, let’s call it ‘your workstation’. But to be clear this is a virtual machine, so that we can easily attach and remove disks.
- Download and install the Windows ADK on your workstation.
- Add a separate drive to your workstation (let’s say E:\) – this will become your WinPE boot disk – a 4Gb disk will suffice.
Next Start the ‘Deployment and Imaging Tools Environment’ as an administrator. This opens up a command prompt, enter the following
- copype x86 c:\WinPE-x86
- MakeWinPEMedia /UFD c:\WinPE-x86 E:
The above commands will make a bootable Windows PE disk out of the 4Gb drive attached as E: to your workstation. Detach this disk now to use in the next step.
Step 3: Boot up into Windows PE and capture the image
Create a new VM (Capture Computer), and select the 4Gb Windows PE boot disk created in Step 2 as the boot disk.
Next, attach the disk created in Step 1, and start the computer; now you have a computer running Windows PE with the image disk attached as a second disk.
The Windows PE system will present you with a command prompt. You need to select the correct partition; to do this we use the diskpart tool:
You can use diskpart to select and list partitions, as well as assign drive letters. In our scenario, disk 0 will normally be the Windows PE disk, so we will be interested in disk 1 (the attached second disk). Furthermore, the actual image that we want will typically be on partition 2. You can use the ‘select partition’ and ‘list partition’ commands to validate this.
Enter the following at the Windows PE prompt:
X:> diskpart
DISKPART> select disk 1
DISKPART> select partition=4
DISKPART> assign letter=S
DISKPART> exit
Now we have assigned driveletter S to the disk we want to capture. We use dism to capture the image:
X:> net use t \\server\share
X:> Dism /Capture-Image /ImageFile:t:\image.wim /CaptureDir:S:\ /Name:”Image-Name”
Now we need to copy the image.wim file somewhere handy; map a drive to copy the WIM file to:
Job Done!